Managing your figures, tables, references, and so much more on a lengthy, complex regulatory document can seem impossible. Even seasoned medical writers struggle when trying to make changes or add content without breaking a document. Chances are, the tools you need already exist. Read on to find out how some of the simplest Microsoft Word tools can allow for smooth changes to maintain an organized, uniform document.
Copy and Paste
CER documents need to be clear and uniform, which can make it difficult to pull content from one document to another without disturbing the style of the document. There are multiple paste options that allow you to either match the formatting of your document or paste text without any formatting. All options can be found under the Home tab on the toolbar in the copy and paste section. Two important functions for CER writing are Match Formatting and Keep Text Only.
Match Formatting: Text is formatted to document content.
Keep Text Only: All text formatting, including hyperlinks, are removed. This is useful when you want to remove all hyperlinks simultaneously.
Templates
A well-designed template functions as a formatting blueprint for your document. While some companies may provide their own template, it is important to be able to create and establish a template to ensure uniformity through your work. With a good template, writers just need to insert the information.
Preset styles found in the Styles section of the Home tab help writers focus on content and quality. Found under the Styles Pane, styles can be quickly modified to match the formatting guidelines for your document. Once a style has been added, it will appear on the styles pane where you can select them when needed.
Styles Pane
Additional features such as an automatic table of contents and cross-referencing can also be added to a template.
Useful Tip: You can save your formatting as a template by selecting File – Save As Template.
Useful Tip: Formatting is a meticulous aspect of any complex document. To reveal formatting, click on the paragraph mark located on the Home tab and all formatting marks appear. This tool makes it easier to edit the formatting without losing content.
Table of Contents
In large, information-dense documents, it is counterproductive to scroll endlessly to find sections of interest. A well-done table of contents in MS Word makes finding specific content simple. This creates a link between corresponding titles in a table of contents instead of requiring a user to manually insert a cross-reference for each section. A table of contents is easy to insert, but users make some common mistakes that can affect the efficiency of the automated tool.
Formatting styles are critical to creating a table of contents. Word provides preset automated table of contents options that require you to pick a style for each of your title types. You will notice that “Heading 1,” “Heading 2,” and “Heading 3” are located where the chapter titles and sections will be. Applying the corresponding styles, located in the Styles section, will determine the format of your table and which titles are linked.
Table of Contents
Decide what text you want to be included on the Table of Contents and use either Heading 1, 2, or 3 – Go to References – Table of Contentson the left side of the ribbon – Choose from the Automated Table of Contents options that are previewed
As a good practice, the table of contents must always be updated at the end of the writing process. Updating the entire table will revise heading changes along with page numbers.
You can modify your table of contents by selecting the Custom Table of Contents option. Changes can be made to the table format and what you want to be included on the table in the dialogue box.
Cross-referencing connects items within a document, similar to a hyperlink, for smooth navigation, which is useful in lengthy documents. You want to use this to ensure the reader can access information quickly without needing to manually search for it. The cross-reference tool can be used to link headings, footnotes, captions, figures, and tables to where they are in the text. Did you know that cross-references can be updated just like the table of contents? Updating is crucial because content is constantly moving around the document from page to page.
To insert a cross-reference, go under the Insert or Reference tabs, and choose the type and caption.
Insert tab: Insert – Link – Cross-reference
References tab: References –Cross-reference
An added benefit to using cross-reference is that it will actively change based on the output. If a document is printed, the cross-reference will change to tell the reader where the content is in printed form.
When pulling tables from PDF documents onto a Word file, a simple copy and paste doesn’t always do the job, requiring the writer to recreate the table. These tables can include important information on instructions, uses of the product, and complex clinical data.
Once you insert a table, use the table Design and Layout tabs to quickly customize a table. The preset styles are a good place to start and can be altered by selecting the menu under Modify Table Style. A modified style can then be saved so it is available anytime you need it.
Table Properties
A split table can cause confusion, especially when a large amount of information is being presented. To resolve this, we can go under the Table Properties and select Repeat as header row at the top of each page to make sure the headings of the table show up if a large table splits across pages. Additionally, by unchecking the box for Allow row to break across pages, you can also prevent a row from splitting up.
Headers and Footers
It is common for a company to want their logo and additional information included on the top and/or bottom of a document’s pages. Headers and footers are integral to any document for this reason and include features that can make editing them easy.
Once you have opened the header and footer edit option, either by double clicking one or choosing the option to insert one, the Design tab appears. Here you can choose style, formatting, and content you want to be included in your header and footer.
Adding a Logo: The easiest way to add a company’s logo is to select Picture From File. Once you have chosen an image, you can edit it the same way you would in the body of the document. A large image will automatically adjust the header or footer length.
Date & Time: This option allows you to automatically add the date and time with multiple format choices.
Text Location: Users have the option to place text in the center, the left, and/or the right of a header and footer. This is useful if you have multiple sets of information you need to include in one space.
Headers and footers, like page numbers, can be excluded from the first page.
Page Numbers
Including page numbers is critical in any long document, but there are other benefits to using them in technical writing. Page numbers can be used in cross-referencing when the text is referring to information found on a specific page. Page numbers can also be modified to fit the needs, and style, of your document.
By default, a number will always appear. However, you can unmark the box that reads Show number on first page when you are first inserting page numbers. This will turn the second page into “page one” of the document, a useful tool for when you have a cover page.
Tracking Changes
Many people will likely be reviewing your document, which is why the ability to track each user’s activity on a long document is so important. Word provides tools for tracking changes, edits, and comments. These tools are useful when one or more people are reviewing/editing a document. All of this can be done under the Review tab.
Track Changes
Changes can be tracked by clicking the Tracking menu – turn on Track Changes. Comments can be inserted by selecting New Comment.
All changes and comments will appear on the side of the page and indicate what has been changed in the document and comments that have been made.
Useful Tip: The Navigation Pane makes it easy to view changes and comments. In addition, it includes a tab where you can view your table of contents and click through it without needing to scroll back the top of the document. The Navigation Pane can be made visible under the View tab.
Page Orientations
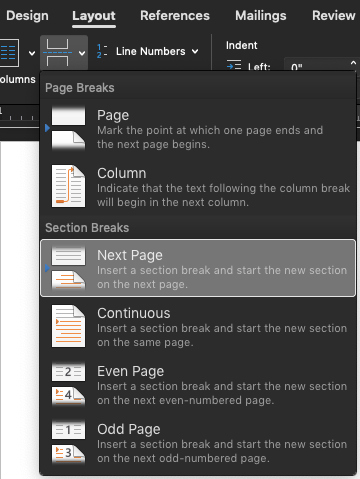
Section Break
Clinical Evaluation Reports (CERs) often include figures and tables that do not always fit on a regular, portrait-oriented page. Page orientations can be found in the Layout tab. If you have a table or figure that is too wide for one page, it is possible to change the orientation of that single page to Landscape.
Go to the Layout tab – Click on the Breaks menu – Select Next Page under Section Breaks (this is not the same as a page break) – Select Landscape under Orientation
Once you are finished, you can insert another section break and return the orientation of the following page to portrait.
Adjusting the orientation to fit specific content saves time and ensures you do not need to alter or potentially lose important information.
This website uses cookies so that we can provide you with the best user experience possible. Cookie information is stored in your browser and performs functions such as recognising you when you return to our website and helping our team to understand which sections of the website you find most interesting and useful.
Strictly Necessary Cookie should be enabled at all times so that we can save your preferences for cookie settings.
If you disable this cookie, we will not be able to save your preferences. This means that every time you visit this website you will need to enable or disable cookies again.
3rd Party Cookies
This website uses Google Tag Manager and Pardot's tracking features to collect information such as the number of visitors to the site, and the most popular pages. Keeping this cookie enabled helps us to improve our website.
Please enable Strictly Necessary Cookies first so that we can save your preferences!